 Are you looking to scale up your content creation and make sure that your website is ranking well in Google searches?
If you’re looking for an easy and effective solution to your content creation needs, then the introduction of AI writers is something that should definitely interest you.
AI writers such as Content at Scale are designed to help make content creation at scale much easier and cost-effective by allowing a user to generate articles in minutes without any other input than just a basic prompt or website address.
This means that if you have an idea for a blog post or an article but simply don’t have the time (or resources) to write it out yourself, then Content at Scale could be the perfect solution for you.
In this blog post, we’ll look at some ways that this amazing piece of technology can help increase SEO rankings and drive web traffic through mass quantities of interesting and unique blog content!
What is Content at Scale?
The Content at Scale platform is one of the BEST AI writing tools for producing high-quality content of 2600 or more words without plagiarism.
And, it’s also designed to be undetectable by AI content detection tools.
To generate long-form blog posts that can be optimized for SEO within the platform, all you need to do is enter a single keyword phrase and a short description.
How to Use Content at Scale
In a nutshell, you’re going to learn how to use Content at Scale to generate COMPLETE articles in minutes, not hours.
– At this point, I’m going to assume you already have a Content at Scale account, if Not…
If you don’t, that’s perfectly OK, you simply won’t be able to follow hands-on, but you can still read through all the information to see how truly, easy it is to use.
With Content at Scale, you can efficiently produce AI-generated content that is optimized for SEO.
The first step for using Content at Scale is to create a Project. Lucky for you, Content at Scale will allow you to create as many projects as you’d like.
If you have a single blog, you’ll only need to create one project.
If you have multiple sites, you can create one or multiple projects for each site.
Let’s start with the first step!
1. Create a New Project
After creating your account and getting your login information, log in and go to the “Projects” section.
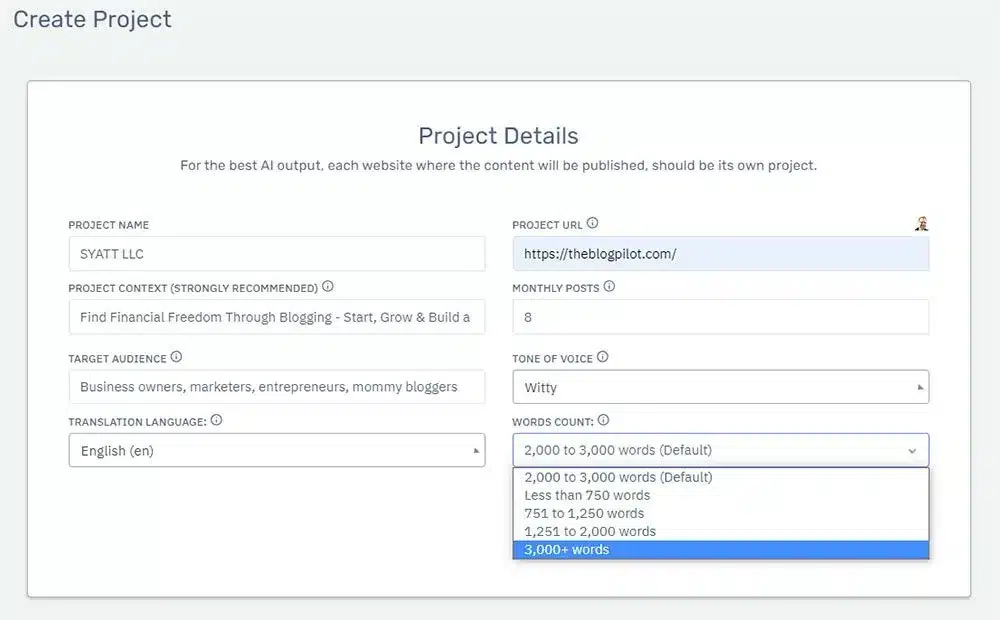
Start by adding a Project Name, include your website’s URL (web address), explain the purpose of your website, and specify your target audience.
You can also customize the default tone and length of your blog posts.
NOTE: You’ll be able to adjust the length of each blog post if you choose.
To customize the tone of voice, the available options for tone of voice can be authoritative, bold, casual, happy, informative, professional, sarcastic, and witty, just to name a few.
To add the word count, simply use the dropdown you feel will be best suited for the average blog posts you intend to have written for you.
By default, the word count is between 2000 and 3000 words.
But you can also select less than 750 words, 751 to 1250 words, 1251 to 2000 words, and more than 3000 words.
NOTE: Content at Scale does not charge per word, only for each post written.
To complete your task, please press the “Create Project” button.
2. Create a Blog Post
After you’ve created your Project, you can click on the “Write Post” button located in the upper right-hand corner to get started.
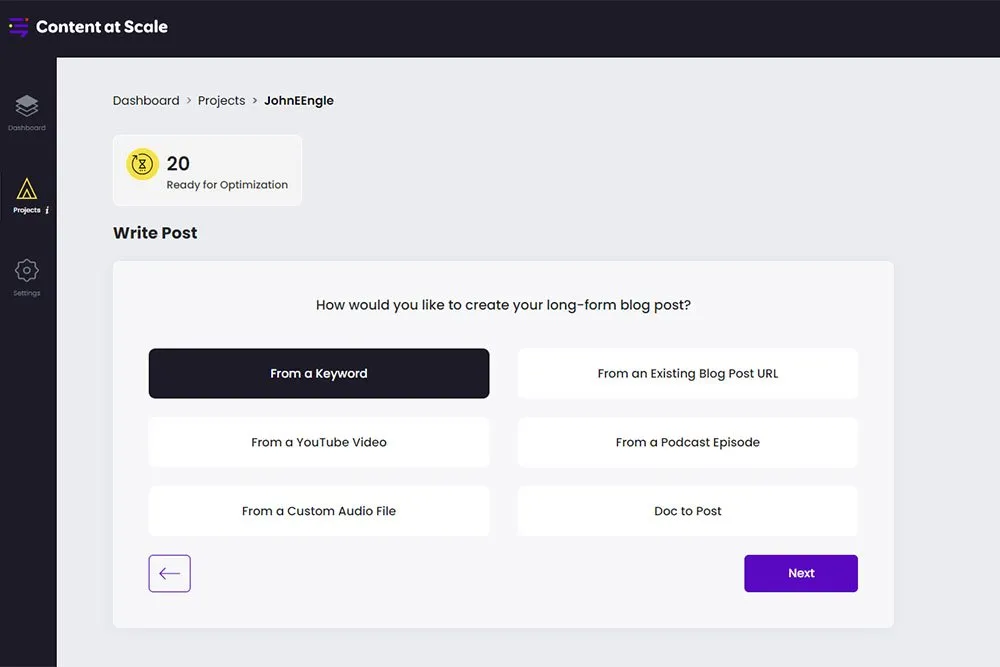
Once you land on this page, you’re going to have many options to create content.
You’ll have the option to create content:
- From a target Keyword Phrase
- From an Existing Blog Post URL
- From a YouTube Video URL
- From a Podcast Episode
- From a Custom Audio File
- From a Document
NOTE: keep in mind that Content at Scale is not plagiarizing any content; it’s simply gathering data and using it as a base model to write your post from whatever option you input.
To add the Keyword Phrase for your article, locate the designated box.
Select the desired word count for your article from the dropdown menu.
Then, you can use commands to provide the AI writing software with any additional context you would like to include in your content.
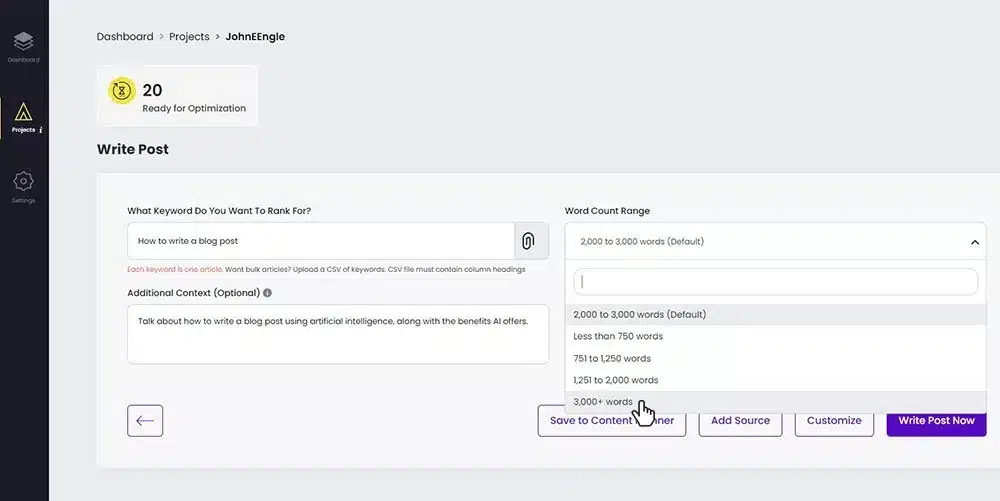
To receive suggestions for headings in your article, which will come from top Google results, click the “Customize” button.
Options: If you choose, you can Add additional Headings using the “+” sign, delete any Heading using the “–” sign, Refresh your Headings for a new set using the Circular Arrow, or Modify a Heading by simply clicking on the Heading itself, to edit.
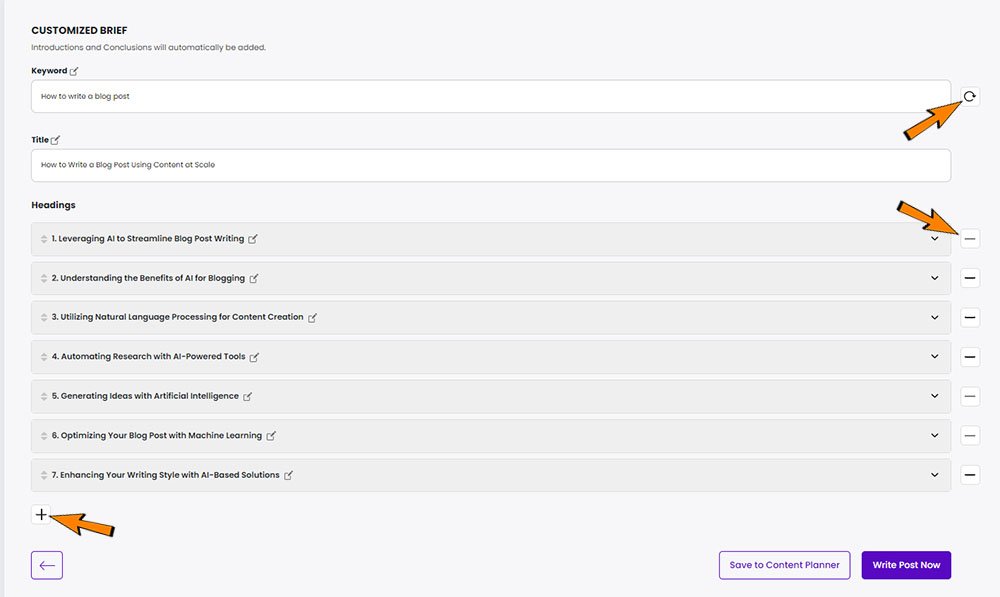
NOTE: You can also Reorder a Heading by moving it up or down (indicated by the hand on the left side of the screenshot) or Remove a Heading by clicking the checkmark next to the hand, then clicking on the Remove button.
Once you’re satisfied with your Headings, click the Write Post Now button.
Bulk Keyword Upload
You can also upload keywords in bulk using a CSV file by clicking on the paperclip-looking thingy next to the keyword input box.
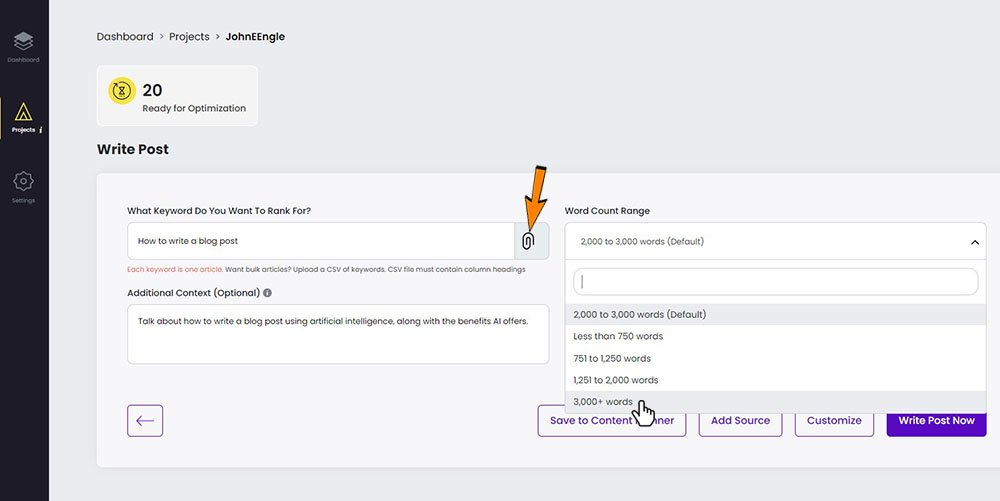
After clicking on the paperclip, it will open the bulk keyword uploader. Simply browse for your CSV file on your computer to add the keywords to the content queue.
NOTE: your CSV file should have only keywords in a single column (CSV file must contain column headings). If you choose, you can also add Context for each keyword in its own column, or you can add it later from the Keywords tab.
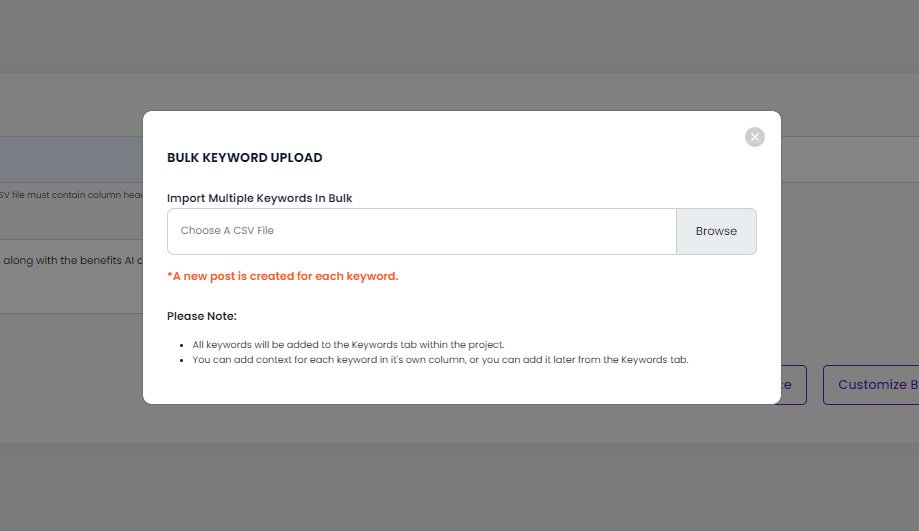
You cannot create the content directly from here. Uploading your CSV file will add it to the Queue.
After reviewing the details and confirming their accuracy, you can either select the relevant keywords individually or in bulk to start the content creation process.
Once you’ve made your selection, click on “Write Post,” and Content at Scale AI will begin creating your content.
3. Project Dashboard
After you click the Write Post Now button, you’ll be directed to the project dashboard. At this point, grab some coffee or a soda and wait for your article to be completed.
I’m exaggerating a little bit because this will only take a few minutes to upwards of 10 minutes.
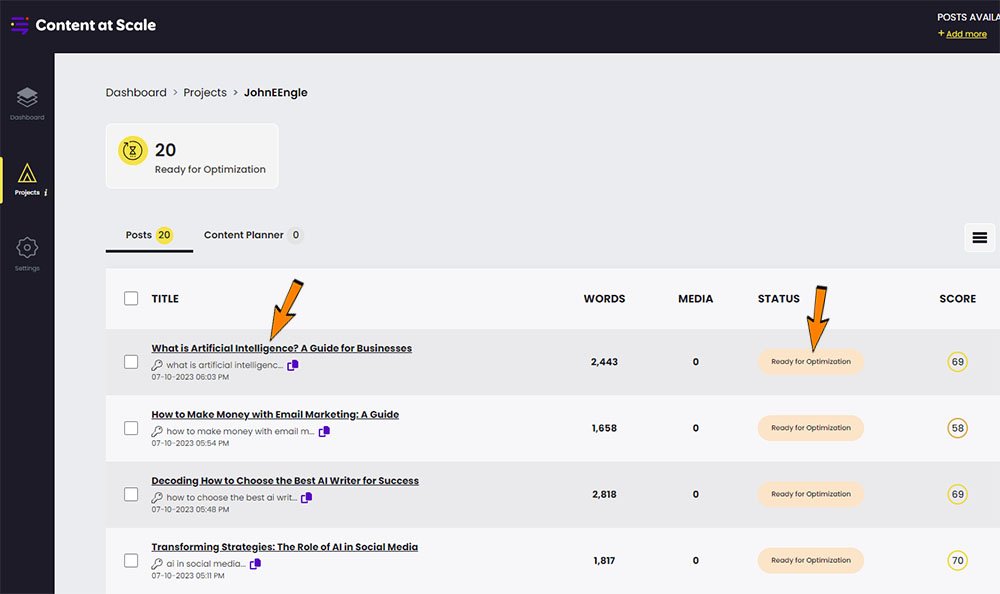
As shown in the screenshot below, once the post is complete and ready to edit, a link will be shown and the “Ready for Optimization” button will be there (this will not be shown until Content at Scale has finished creating your content).
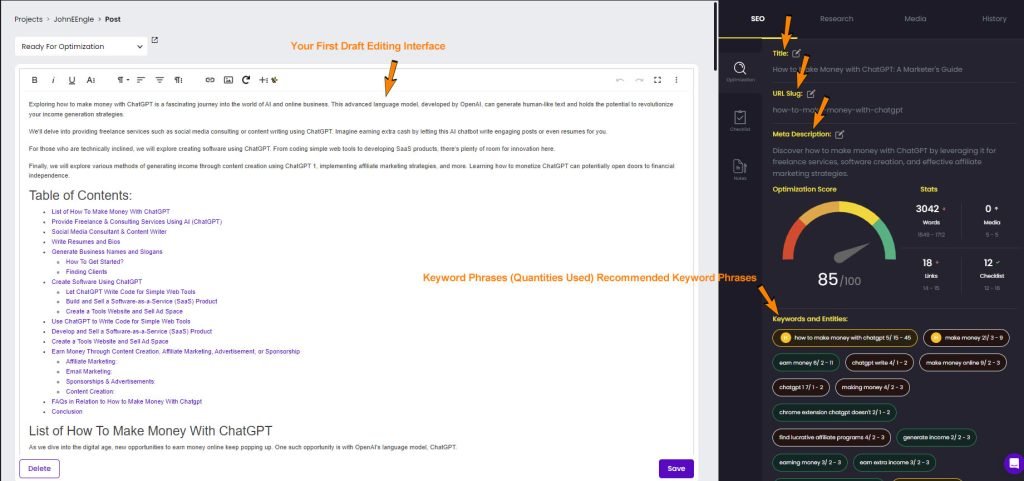
Below is a screenshot of your Content Editing window. This will be the location to edit your content.
In the screenshot below as indicated by the arrows on the right side, you’ll be given the Title, URL slug, along with the Meta Description, which is all Editable.
CLICK ON THE IMAGE FOR MORE DETAIL (Use Your Back Arrow to Return to the Post)!
Editing Your Article
As you can see, this editing dashboard contains a large amount of information to help you achieve top-ranking articles for the search engine results pages.
Content at Scale includes a brief Introduction, Headings, Table of Contents, and Lists for each article processed.
It will also include editable key takeaways if you choose (you can keep them from being added in Settings) that summarize each section. These takeaways are included at the end of each heading.
Your blog content will also contain a FAQ section and a Conclusion section.
Content at Scale text editor allows you to customize and incorporate NLP keywords by using the optimization tab.
Content at Scale offers a collection of images that are Royalty-Free and can be used as your Featured Image.
It performs a search based on the title of your article, and you can select the one you prefer.
Content at Scale also gives you the option to upload your own images.
This AI writing tool is also unique from other Content at Scale competitors because it provides an SEO-optimization tool.
This AI writing software will assist you in adding the most appropriate keywords to your text while evaluating the word count of the top-ranking pages.
Here are a few things the CaS Edit Box offers:
- This AI tool will display the frequency of the keywords used in your post and recommend semantically related keywords to improve your rankings.
- CaS not only generates a Title for you, but it also provides a Meta Description for SEO.
- The On-Page Optimization Checklist will update automatically as you follow its suggestions and make changes.
- The AI tool automatically generates a Table of Contents for your article and provides Key Takeaways to enhance reader engagement and reinforce the main points.
- It will add a FAQs section at the bottom of the article, which is an SEO benefit, which can improve your search engine rankings.
- It will also include Click to Tweet phrases that can help you get the word out with social media.
To summarize, Content at Scale provided you with a complete draft unlike any other AI writer available.
Other AI writers typically only generate a few paragraphs or a small blog post based on a few sentences you provide.
With Content at Scale, you’ll receive a 3000+ word draft that you can give a quick once over and go directly to publishing or edit to your heart’s content.
Right Panel (SEO, Research, Media & History)
In this right panel, you’ll see 4 tabs:
- SEO
- Research
- Media
- History
SEO Tab
The SEO tab consists of 2 Sub-Tabs:
- Optimization – this will show your Title, URL slug, and Meta Description, along with your Optimization score and Keyword phrases.
- Checklist – provides an On-Page SEO checklist that shows when you’ve completed certain modifications.
Using natural language processing enables you to discover numerous related keywords that are deemed highly relevant by search engines, such as Google, to the primary keyword.
Having relevant keyword phrases within your text is important for search engines to associate your content with your target keyword.
AI SEO tools have a feature that content marketers use to boost their search ranking, which is not normally available in other AI writing tools.
Content at Scale is the BEST of both worlds – it’s a Mass Quantity content creator and SEO tool ALL in ONE!
Research Tab
The Research tab has 4 sub-tabs:
- Brief – this is where you can modify your headings and do Reruns
- Ranking Content – see all the top post rankings for your chosen keyword phrase
- Plagiarism Checker – check for plagiarism directly from your dashboard
- AI Detector – check your content for AI detection right from the dashboard
Media Tab
The Media tab is where you can choose from a Gallery of images or upload your own Featured Image.
History Tab
The History tab is just like it says; it shows the history of everything you’ve done.
Rerunning Your Post
If you’re not happy with the AI-generated content, you can ask for it to be Rerun up to 2 more times.
To ReRun your post, click on the Research tab, which will open the first sub-tab, which is where you’ll find the Rerun option (Brief sub-tab).
At this point, click on the Rewrite Options button, which will open the options.
At this point, you to give additional context.
It’s highly suggested that you provide a clear and concise description of the article you want the AI to write and then click on “Rewrite Post” to start the process.
Or, click on the Customize button to make changes to the Headings.
As mentioned previously, you’ll have the option to include any new headings, modify any of the existing headings, or change the order of the sections.
Once you have done any modifications, click on the Rewrite Post button to recreate your new blog post.
4. Running the AI Detector and Built-In Plagiarism Scanner
Once you’ve completed your post, it’s recommended to perform two scans to check for originality.
Make sure you avoid getting flagged by an AI bot detector by using the Free Content at Scale AI Detector to review your content.
To check your blog post for AI-written content, follow these steps:
- Copy your content
- Visit the provided CaS AI Detector link
- Paste your content into the designated box and click the “Check for AI Content” button.
This process takes roughly 15 to 20 seconds, after which your results will be displayed on the right side of the page.
As you can see in the screenshot below, it shows that the How to Make Money with ChatGPT post scored 99% on the human-written content test.
Ironically, I ran the AI detection test prior to adding more content, which actually showed a 100% human content score.
Seeing that it was 100% human before I changed a word of the post suggests that the algorithms are still not entirely perfect yet.
You really don’t have too much to be concerned about as long as your percentage is 70% or higher.
Built-in Plagiarism Scanner
You can also request a plagiarism scan right from the Content at Scale dashboard. Simply go to the Review tab in your Edit dashboard and click on the “Request Plagiarism Scan” button.”
20 to 30 seconds later, the blog post shows as plagiarism-free, as shown below!
The plagiarism scanner will notify you of any plagiarism; all you need to do is rephrase the highlighted text.
5. Exporting Your Content Into WordPress
To export your content from Content at Scale, you have various options.
You Can Export (How to… instructions below):
- Via WordPress Plugin
- Export to a Word Doc
- Export to a Google Doc
- Export as standard HTML Document
- Or, simply Copy and Paste directly from the dashboard (virtually the same as HTML Document)
You simply need to figure out which one works best for you.
1. WordPress Plugin
Content at Scale has a feature that enables the direct import of finished content to the WordPress dashboard.
When you import your finished content, your WordPress site will pull in various elements such as your title, URL slug, featured image, and table of contents (if included).
To do this, your first step will be to download and install the WordPress plugin to your WordPress site.
To download the plugin, access your dashboard and hover your cursor over your profile name located at the upper right-hand corner of the screen.
Once the dropdown appears, click on the link that says “Download WP Plugin.”
Next, import the plugin into your WordPress site.
After downloading the plugin and importing it to your WordPress site, go to your “Projects” tab.
Hover your mouse over the three dots located beside your project name, which will produce a dropdown menu.
To connect Content at Scale with your WordPress site, click on the “Connect WP” link and copy the API key provided.
Then, paste the API key into your WordPress plugin.
Once you’ve copied and pasted this API key into your WordPress plugin, you’ve finished that step.
The last step to be able to import your blog post into your WordPress dashboard will be to revisit your Projects where you hovered over the three dots, and this time, click on Manage Settings.
Locate the “Post Statuses” section by scrolling down to the bottom of the page.
Then, click on the white space with your mouse next to the word “Publish” to access the drop-down menu.
Select the “Pending Editing” option.
After doing that, scroll to the top of the page and click on “Save.”

Go back to your Content at Scale dashboard, where your article is located.
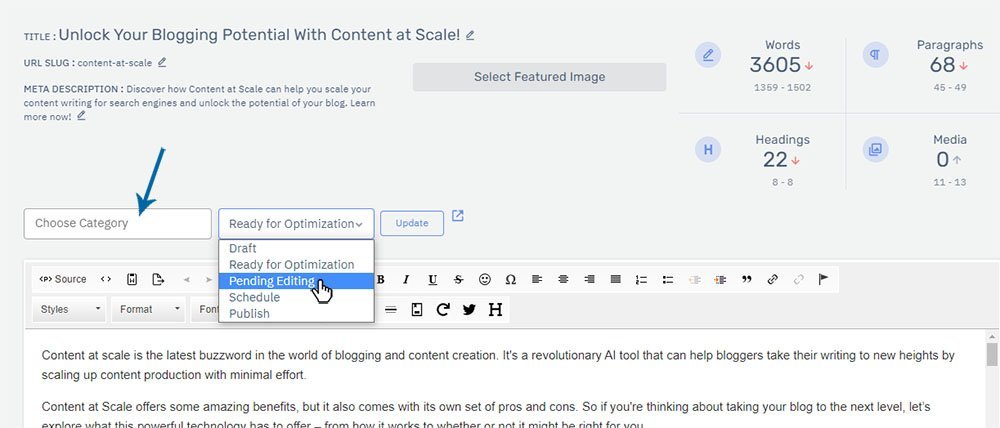
Once there, select your desired category from the dropdown menu to import the content directly into your WordPress site.
To proceed, select the “Ready for Optimization” dropdown menu and choose the “Pending Editing” option.
After you’ve done that, click on the “Update” button. Your article will then be imported into your WordPress site.
2. Word DOC & Google Doc
Another method you can do is to export content from Content at Scale to a Google or Word DOC file.
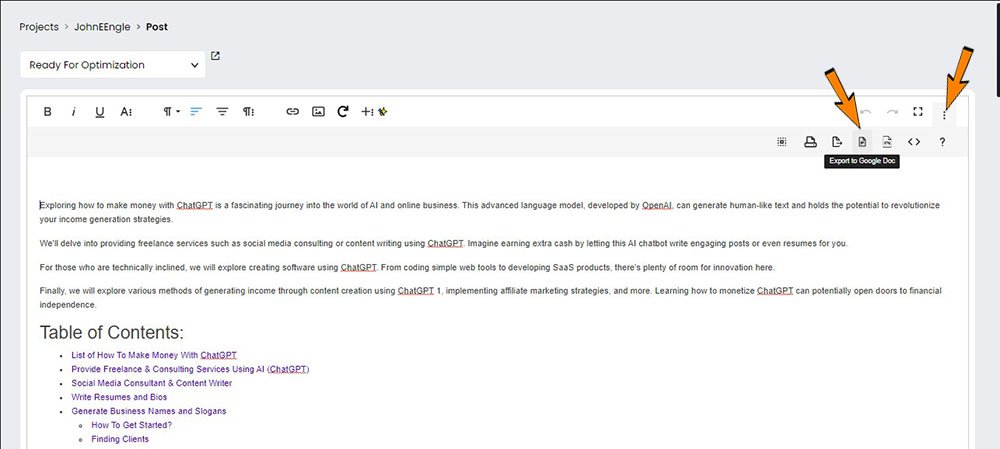
Use either command to save the article and all its images into a single file that you can later upload to your content management system.
To begin, click on the 3 dots in the upper right-hand corner of your Edit Box. It will give you a drop-down menu, which you can click on any of the buttons to export your blog post to Google Docs, Word, or HTML.
Once you have your Google Doc or Word Doc file, you can use the WordPress Mammoth .docx converter plugin to upload your content without any formatting issues.
3. HTML or Copy & Paste
Both of these methods work the same. The only difference is that when you click on the HTML button in the Content at Scale dashboard, it will download an HTML file to your computer.
If you were to open the file, it will show you your content on a white background screen making it much easier to read your finished product.
If all looks good, simply copy and paste it into your WordPress dashboard.
The copy and paste method I’m referring to without using the HTML button for a download is simply copying the content directly from the Content at Scale dashboard, then pasting it directly into your WordPress “Add New” Post page… Viola!
Content at Scale FAQs
How does Content at Scale work?
The process used by Content at Scale to create a complete post involves a blend of 3 AI engines, natural language processing, semantic analysis algorithms, and crawling the top-ranking websites on Google.
Is Content at Scale accurate?
Content at Scale AI detector shows good performance in identifying AI-written long-form articles with a 98% accuracy rate.
Is Content at Scale good at detecting AI?
You can use Content at Scale’s Advanced AI Detector for Free to determine whether your content was generated by a human writer or by ChatGPT, GPT4, & Bard AI models.
The Content at Scale AI checker is unique and was one of the earliest to be developed.
It provides a more in-depth analysis than other generic AI content detectors and also has a more transparent scoring system.
Does Content at Scale generate undetectable AI content?
The short answer is Yes. Content at Scale is one of the first AI text generators known for creating content that is undetectable to AI detectors.
Content at Scale takes pride in producing high-quality, human-like written content.
They also have strict quality control measures in place to ensure that all the content written meets the highest quality standards and is free from any plagiarism or duplication.
If you use someone’s Affiliate Link, you’ll receive 20% More post credits on any plan you choose.
What do content writers charge per hour?
- For Entry-Level, the range is $15 to $30 per hour
- For the Intermediate Level, the range is $35 to $60 per hour
- For the Experienced Level, the range is $65 to $100 per hour
Conclusion for the Content at Scale Tutorial
In conclusion, using Content at Scale can be a great way to keep your SEO optimization up-to-date.
By leveraging an AI writer to create blog posts, you can quickly build out and update pages for long-term success.
If you are consistent in monitoring the quality of the content and take the proper steps to ensure it matches search intent, then you’ll be able to leverage a cost-effective solution with the potential for solid returns.
Even though there is no silver bullet, strategic automation is certainly a viable option that’s only becoming more accessible over time and may require some patience while perfecting the process.
Additionally, keeping an eye on targeting and long tail keyword phrases, as well as diversifying anchor texts for backlinks, could help increase traffic opportunities created from this type of optimized content.
As Steve Jobs said – “Stay hungry…stay foolish” Remember that when utilizing an AI writer and creating Content at Scale, make sure those ambitions remain high.
Remember that an AI writing tool is only a writing assistant and should be viewed as such.
ONE Last NOTE: In order to maintain the quality of your website, make sure to fact-check all important statements in every article you create.


